If you’ve ever wanted to create a stylish, custom-made lighting piece, a laser cut wood lamp is a beautiful and rewarding project. Whether you're crafting for your home, creating a heartfelt gift, or expanding your small business product line, this guide will walk you through the entire process—from selecting the right plywood to laser cutting and assembling the lamp.
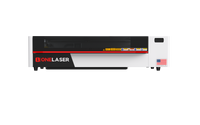
Using the OneLaser XRF machine, you’ll get precise, clean results and a smooth workflow even if you’re new to laser cutting. Let’s get started!

1. Why Choose a Laser Cut Wood Lamp?
Laser cut wood lamps offer a perfect blend of functionality and design:
- Customizable: Personalize with patterns, names, logos, or designs.
- Sustainable: Use eco-friendly plywood and LED bulbs.
- Stylish: Adds a modern, rustic, or artistic touch to any room.
- Gift-Worthy: A perfect handcrafted gift for birthdays, weddings, or holidays.
2. How to Choose the Right Plywood for Laser Cutting
Before you begin, selecting the right material is crucial to achieving clean, precise cuts.
- Thickness: For lamp projects, 3mm plywood sheets are ideal. They’re easy to cut and strong enough for assembly.
- Core Type: Choose laser-grade plywood with minimal resin or glue content (birch is a great option).
- Surface: Go for smooth, knot-free surfaces to ensure uniform cuts and aesthetics.
- Warping: Make sure the sheet is flat and not warped, as uneven material can affect the cut quality.
Pro Tip: Avoid MDF-core plywoods for this type of project—they tend to produce more smoke and don’t hold fine cuts as well.
Learn more: Best Wood for Laser Engraving
3. What You’ll Need
Here’s everything to prepare before cutting your lamp:
- 3mm laser-grade plywood sheets
- Laser design file (in SVG, DXF, or AI format)
- OneLaser XRF Machine
- Wood glue or clear adhesive
- Optional: Candle, Sandpaper, LED light source, finish or wood stain
4. Step-by-Step Guide: How to Laser Cut a Wood Lamp
Step 1: Import the Design File
- Open LightBurn or your preferred laser software.
- Go to File > Import, and select your lamp design.
- Ensure that the design is set to cut, not engrave. Most lamp designs include interlocking shapes or panels.
Make sure the design is correctly scaled to your plywood size (usually 300 x 600 mm for OneLaser XRF’s workspace).
Step 2: Enter Your Laser Cut Settings
Use the following settings as a starting point for 3mm plywood:
- Speed: 25 mm/s
- Max Power: 90%
- Min Power: 20%
- Mode: Line (for cutting)
These settings ensure deep, clean cuts without excessive burning or charring.


Step 3: Place the Plywood Sheet on the Laser Bed
- Position your plywood sheet flat on the honeycomb tray.
- Make sure it's aligned with the machine’s origin point (usually the top-left corner).

Step 4: Set Up Alignment Using OneTouch™
On the OneLaser XRF’s OneTouch™ Screen:
- Tap the Alignment menu.
- Use the red dot pointer to frame the design.
- Confirm that the design will fit within the boundaries of your material.
This step helps avoid misalignment and wasted material.

Step 5: Start Laser Cutting
- Double-check your settings and preview the job using LightBurn’s Preview feature.
- Hit Start on the touchscreen to begin cutting.
- Stay nearby to monitor the progress and ensure safety during operation.

Step 6: Clean and Assemble the Lamp
Once your lamp pieces are cut:
- Gently remove them from the laser bed.
- Sand edges if needed.
- Follow the design layout to attach the pieces using wood glue or clear adhesive.
- Let the glue dry completely before installing your LED bulb or base.
Optional: Add a wood finish or stain for a premium, polished look.


5. OneLaser XRF: Precision Meets Affordability
The OneLaser XRF is a desktop laser cutting machine designed for creators, makers, and small businesses. Built with a 38W RF metal tube, it offers instant startup, long lifespan, and exceptional beam quality—ideal for detailed laser cut wood lamp projects.
Why It’s Perfect for Wood Lamp Projects:
- 38W RF Metal Tube: Delivers fine, sharp cuts with longer lifespan and instant startup.
- Workspace: 600 x 300 mm—perfect for small to medium-sized wooden designs.
- Advanced Motion Control: Ensures vibration-free, clean cuts.
- Smart Features: OneTouch™ panel, autofocus, red dot alignment, and camera integration.
- Desktop-Friendly: Ideal for small shops, studios, or home workshops.
Whether you’re cutting, engraving, or prototyping, the XRF gives you the power and precision needed to bring your creative ideas to life.
Explore the OneLaser X Series!

FAQs
Can I engrave and cut in one job?
Yes! The XRF lets you set different layers for engraving and cutting in a single project using LightBurn.
What kind of plywood should I avoid?
Avoid MDF-core plywood and anything with heavy glue content. These produce more smoke and may not cut cleanly.
Can I use a rotary tool for curved lamps?
The XRF supports rotary attachments, but for a wood lamp with flat interlocking parts, a rotary tool isn’t needed.
How long does a wood lamp take to cut?
Most designs take between 5–15 minutes depending on complexity and machine power.
Can I sell laser cut wood lamps?
Absolutely. Laser cut lamps are a popular product on Etsy, craft fairs, and in boutique home décor shops.
Have Questions? Contact Us Now!
Crafting a laser cut wood lamp is both satisfying and scalable—perfect for personal use, gifts, or launching your own creative business. With the right material, a great design file, and a powerful laser cutting machine, you can bring your vision to life with precision and ease.
Learn more: What Are the Different Types of Laser Cutting Machines?

 Liquid error (sections/image-banner line 171): invalid url input


